

![]()
|
|
Indexing a Document |
By refering to index topics using index marks in your document, you can use PageStream to automatically create an index for your document. The typical content of an index starts with a title, then alphabetic headings with index topics and the pages those topics will be found on and any references to similar topics.

To add an index topic: Choose Index Topics from the Define submenu in the Edit menu to display the Define Index Topics dialog box. Click New Topic. The Insert Index Topic dialog box will appear. Enter the new index topic into the Topic text box. Click Insert. Click Done to close the Define Index Topics dialog box. Note: Index topics can also be added automatically when inserting index marks into the text.
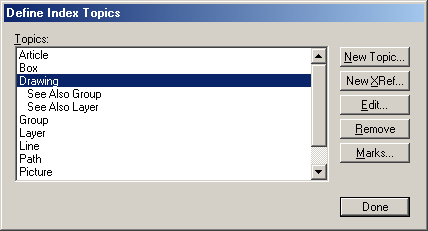
To edit an index topic: Choose Index Topics from the Define submenu in the Edit menu to display the Define Index Topics dialog box. Choose the index topic to edit from the Topics list box. Click Edit. The Insert Index Topic dialog box will appear. Enter the new index topic into the Topic text box. Click Insert. Click Done to close the Define Index Topics dialog box.
To delete an index topic: Choose Index Topics from the Define submenu in the Edit menu to display the Define Index Topics dialog box. Choose the index topic to delete from the Topics list box. Click Remove. The index topic, it's cross-references and index marks will be deleted. Click Done to close the Define Index Topics dialog box.
To add a cross-reference to another index topic: Choose Index Topics from the Define submenu in the Edit menu to display the Define Index Topics dialog box. Choose the index topic to add a cross-reference to from the Topics list box. Click New XRef. The Edit Index XRef dialog box will appear. Choose the new index cross-reference from the XRef pop-up menu. Click OK. Click Done to close the Define Index Topics dialog box.
To edit an index cross reference: Choose Index Topics from the Define submenu in the Edit menu to display the Define Index Topics dialog box. Choose the index cross reference to edit from the Topics list box. Click Edit. The Edit Index XRef dialog box will appear. Choose the new index cross-reference from the XRef pop-up menu. Click OK. Click Done to close the Define Index Topics dialog box.
To delete an index cross reference: Choose Index Topics from the Define submenu in the Edit menu to display the Define Index Topics dialog box. Choose the index cross-reference to delete from the Topics list box. Click Remove. Click Done to close the Define Index Topics dialog box.
![]()
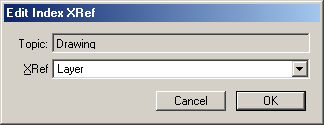
To insert an index mark: Select the Text tool from the
toolbox and place the insertion point where the index mark will
be inserted. Choose Index Mark from the Insert submenu in the
Type menu. Choose a predefined index topic from the mini pop-up
menu, or enter a new index topic into the Topic text box. Click
Insert. Note: A new index topic entered will be added to the list
of defined index topics. Index topics can also be predefined using
Define Index Topics from the Define submenu in the Edit menu.
To delete an index mark: Choose Index Topics from the Define submenu in the Edit menu to display the Define Index Topics dialog box. Choose the index topic the index mark references from the Topics list box. Click Marks. The Index Topic Marks dialog box will appear. Choose the index mark to delete from the Marks list box. Click Delete. Click OK. Click Done to close the Define Index Topics dialog box.

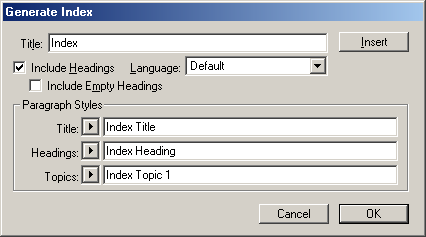
To create an index: Select the Text tool from the toolbox and place the insertion point where the index will be inserted. Select Index from the Generate submenu from the Edit menu to display the Generate Index dialog box. Enter a title for the index in the Title text box. Select Include Headings to include alphabetic headings. Select Include Empty Headings to include headings which have no corresponding index topic entried. Select the language from the Language pop-up menu. The language controls the headings and their order. Select a paragraph style for the title, headings and topics from the coresponding Title, Headings and Topics pop-up menu or enter them in the text boxes. Select Insert to generate and insert the index at the current text cursor position. Click OK to save the settings without inserting the index.
With a structured use of paragraph tags, building a table of contents is a quick and easy task.
To select paragraphs to be included in the table of contents: Choose Text Styles from the Define submenu in the Edit menu to display the Define Style dialog box. Choose Paragraph from the Type pop-up menu. Choose the paragraph style tag used for chapter headings in the Styles list box. Click Edit. The Paragraph Style dialog box will appear. Select Include in TOC. Click OK. Click Done to close the Define Style dialog box. Note: You may also edit the paragraph style by holding down the shift key while choosing the paragraph style from the Paragraph Styles submenu in the Type menu, or by holding down the shift key while choosing the paragraph style from the Styles palette, or by choosing Edit from the mini-menu in the Styles palette when the paragraph style is selected in the Styles Palette.
![]()
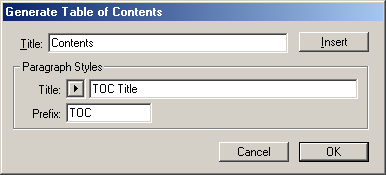
To create a table of contents: Select the Text tool from the toolbox and place the insertion point where the table of contents will be inserted. Choose Table of Contents from the Generate submenu from the Edit menu to display the Generate Table of Contents dialog box. Enter a title for the table of contents in the Title text box.. Choose a paragraph style tag for the title from the Title pop-up menu or enter it in the text box in the Paragraph Styles group. Enter the paragraph styles prefix to use for the table of contents elements in the Prefix text box. Select Insert to generate and insert the table of contents at the current text cursor position. Click OK to save the settings without inserting the table of contents.
The paragraphs of the table of contents will be identical to the corresponding paragraphs in the document tagged with a paragraph style tag set to Include in TOC, except the paragraph style tag will be prefixed with the text entered in the Prefix text box from the Paragraph Styles group from the Generate Table of Contents dialog box. Each level of the table of contents may then be custimized by editing the appropriatly named paragraph style tag.
By marking figures and drawing in your document using figure marks, you can use PageStream to automatically create a table of figures for your document. The typical content of an table of figures starts with a title, then an alphabetic list of figure types with their figures sorted by location in the document. Each figure mark in a figure type catagory is numbered sequencially from the start of the document to the end.

To add a figure type: Choose Figure Types from the Define submenu in the Edit menu to display the Define Figure Type dialog box. Click New. The Edit Figure Type dialog box will appear. Enter the new figure type into the Type text box. Click OK. Click Done to close the Define Figure Type dialog box. Note: The Define Figure Type dialog box can also opened when inserting figure marks into the text.
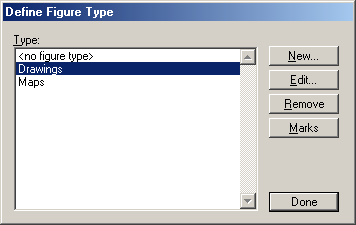
To edit a figure type: Choose Figure Types from the Define submenu in the Edit menu to display the Define Figure Type dialog box. Choose the figure type to edit from the Type list box. Click Edit. The Edit Figure Type dialog box will appear. Enter the new figure type into the Type text box. Click OK. Click Done to close the Define Figure Type dialog box.

To delete a figure type: Choose Figure Types from the Define submenu in the Edit menu to display the Define Figure Type dialog box. Choose the figure type to delete from the Type list box. Click Remove. The figure type and figure marks will be deleted. Click Done to close the Define Figure Type dialog box.
![]()
To insert a figure mark: Select the Text tool from the
toolbox and place the insertion point where the figure mark will
be inserted. Choose Figure Mark from the Insert submenu in the
Type menu. Choose a figure type, or <No Figure Type>, from
the Type pop-up menu. Enter the title for the figure into the
Name text box. Click Insert. Note: If a new figure type needs
to be created, choose the browse button to the right of the Type
pop-up menu and the Define Figure Type dialog box will appear.

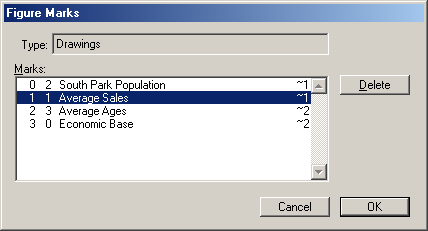
To delete a figure mark: Choose Figure Types from the Define submenu in the Edit menu to display the Define Figure Type dialog box. Choose the figure type from the Type list box. Click Marks. The Figure Marks dialog box will appear. Choose the figure mark to delete from the Marks list box. Click Delete. Click OK. Click Done to close the Define Figure Type dialog box.
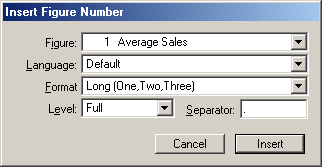
To insert a figure's number: Select the Text tool from the toolbox and place the insertion point where the figure's number will be inserted. Choose Figure Number from the Insert submenu in the Type menu. Choose a figure from the Figure pop-up menu. Choose the display method for the number from the Format pop-up menu. When needed, choose the language for the long number display method from the Language pop-up menu when different than the default language for the text. Choose the number type Default, Full or Current from the Level pop-up menu, and as required the text to use between levels in the Separator text box. Click Insert.
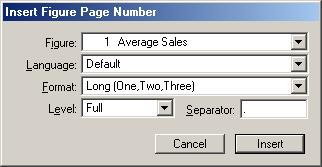
To insert a figure's page number: Select the Text tool from the toolbox and place the insertion point where the figure's page number will be inserted. Choose Figure Page # from the Insert submenu in the Type menu. Choose a figure from the Figure pop-up menu. Choose the display method for the page number from the Format pop-up menu. When needed, choose the language for the long page number display method from the Language pop-up menu when different than the default language for the text. Choose the page number type Default, Full or Current from the Level pop-up menu, and as required the text to use between levels in the Separator text box. Click Insert.
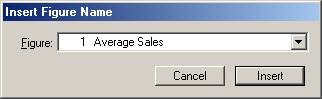
To insert a figure's name: Select the Text tool from the toolbox and place the insertion point where the figure's name will be inserted. Choose Figure Name from the Insert submenu in the Type menu. Choose a figure from the Figure pop-up menu. Click Insert.
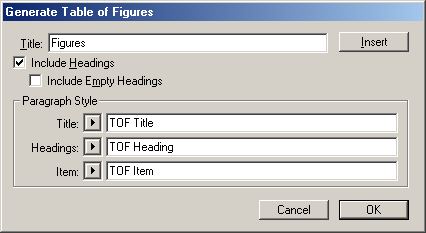
To create a table of figures: Select the Text tool from the toolbox and place the insertion point where the table of figures will be inserted. Select Table of Figures from the Generate submenu from the Edit menu to display the Generate Table of Figures dialog box. Enter a title for the table of figures in the Title text box. Select Include Headings to include the figure type headings. Select Include Empty Headings to include figure types which have no corresponding figure marks. Select a paragraph style for the title, figure types and figure marks from the coresponding Title, Headings and Item pop-up menu or enter them in the text boxes. Select Insert to generate and insert the table of figures at the current text cursor position. Click OK to save the settings without inserting the table of figures.
|
|